Last year, with the aim of improving the quality of photographs of my figures, I invested in a portable lightbox in the form of the a Foldio.
 |
| Foldio portable lightbox |
The resulting images have certainly been much better lit, and have maximised the potential of my rather inadequate camera. But while pictures like the one below are all very well for showing off figures, they not particularly exciting.
The neutral grey background is rather, well, neutral. And when you start posing figures together they tend to look a bit silly without wider surroundings. What I love to see is miniatures photographed in situ - with a nice backdrop or some terrain to enhance the look. I know from experience that I don't have the patience or photography equipment to make the most of miniatures in terrain. In fact I don't even have enough terrain. So my solution is to build a flexible backdrop which fits into my Foldio. By moving elements around and even creating drop in walls, I can vary the setting ad infinitum, and hopefully get some nice, well-lit and narrative photographs as a result!
Step 1 was to create the shell of my backdrop. This was simply made to slot into the Foldio from 6mm MDF and glued with wood glue.
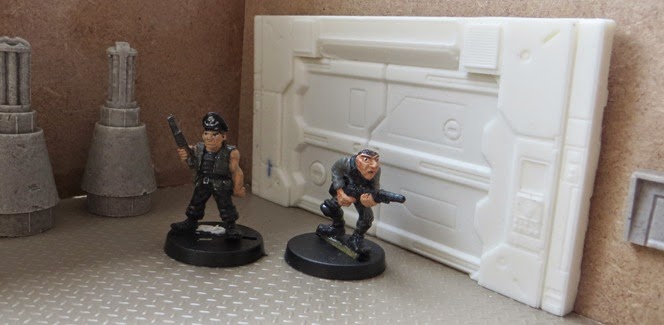
Step 2 was to think long and hard about how to detail the walls and floor. With some very helpful input from cheetor over at the sho3box, I decided to make the shell with a vaguely industrial feel by adding flat scenic elements and an industrial floor from embossed plasticard. The industrial setting will allow me to use it as a spaceport, hiveworld, cargo bay, warehouse or similar. Here's some pictures of the work in progress detailing.
 |
| Pipes and conduits in the left corner have been glued, but the doors are freestanding so I can move or even remove them. |
 |
| The barrels and industrial supplies are freestanding. |
 |
| Remove the barrels and add some crates, and we've got a shoot-out in a warehouse. |
 |
| The big cargo bay doors can be relocated onto the right wall if I wish. |
 |
| Some tweaking to the conduits feeding the fans. Note the door has moved to the rear wall. |
I have a few minor details to add, then I'll be painting the base 'set' and some of the scatter terrain. I've got an order in with Ainsty at the moment for a range of additional elements, including steps, pillars and other structures which will help to create a really flexible setting.
Phase 2 will revolve around making a slot in floor and additional walls to make an entirely new scene (probably an external scene on a fringe world). Stay tuned for more progress as it happens.


That looks really promising :)
ReplyDeleteWere all of those photos taken inside the Foldio? I thought that the sides of the "set" might obstruct too much light, but they look pretty great!
I have been adding adhesive steel to the back of some of the lighter/flatter items that I have been using to dress my terrain pieces lately. In conjunction with adhesive magnets on certain points on the terrain it means that I can add appropriate signs and small occasional terrain bits to specific areas. Something similar would work well here too I think.
Its going to be fun watching this develop further, great work so far.
No cheetor - it's an oversight, but none of the photos were taken in the Foldio! I'll rectify that next time, I'm hoping the lighting is OK too.
DeleteI'm off to search for adhesive steel / magnets now!
I hadn't even thought about building a set piece to go inside the foldio!
ReplyDeleteLooks promising, can't wait to see some more pics.
I may give it a go myself, thanks for the inspiration :)
Excellent! I'd love to see what you produce :)
DeleteReally inspiring stuff. As someone who's just venturing into rogue trader from fantasy, I've got an itch to scratchbuild like this. Any other good suggestions for where to buy bitz for this purpose?
ReplyDeleteI've got a mix of stuff - primarily Ainsty Castings and Zinge Industries. The MDF was from a DIY store and I went to a local railway shop for a stock of textured plasticard and different thicknesses of plastic rod. The larger pipes on the left side were actually from a garden toy spinny windmill thing!
DeleteReally nice! Looking forward to see more, you are taking this to another level!
ReplyDeleteThanks Suber. I've been merrily looking at terrain for inspiration :)
DeleteThat is looking great so far, though I would have worried the sides would block light - it will be interesting if you posted shots of the whole set-up to see how you are getting around that.
ReplyDeleteWarburton
Let's hope that doesn't happen! The lights I use are inside the light box top (front and rear) rather than from the outside. I'll take pics in the next update :)
DeleteThat's a great job. Can't wait to see it all done.
ReplyDeleteThanks! I can't wait to get it finished either.
DeleteClever. As a painter who doesn't game and thus doesn't have a real terrain collection, I've had similar ideas and made backdrops with foamcore and printed textures to make my pics more interesting. I never thought to put the whole setup inside a light box, though!
ReplyDelete